Building A Test Environment on AWS With Terraform: A Step-By-Step Guide

Hey there! I'm a DevOps engineer, and I absolutely love what I do. I'm passionate about working with code and making sure everything is running smoothly. But I also have a real flair for writing. I want to make technical information more accessible to beginners, and help people feel confident using technology. That's why I've decided to combine my two passions and start writing about tech.
I'll be sharing tips, tricks and tutorials on everything from coding to cloud computing. So if you're new to the world of tech, or just want to learn more about what goes on behind the scenes, be sure to check out my blog.
This short project is tailored to cover some of the most important aspects of using terraform to provision resources on AWS.
In this project, we will build a test environment. The environment is made up of a:
- VPC
- Public subnet
- Internet gateway
- Route Table
- Security Group
- Keypair
- Finally, we will launch an EC2 instance into the VPC.
Let’s get to it!
Prerequisite
To follow through with this project, there are a few things you must have and set up on your local machine. These include:
- An AWS account with admin privileges. You can learn how to create an AWS account HERE.
- AWS CLI is set up on your local machine. You can learn how to set up AWS CLI HERE.
- A good understanding of cloud fundamentals and some experience creating services in a public cloud, AWS in this case.
- Terraform is installed on your local machine. You can learn how to install Terraform HERE.
- Git is installed on your local machine. Learn how to install git HERE
Now that the prerequisites are out of the way let's proceed.
Terraform and Provider Blocks
Terraform block allows us to configure some behaviors of terraform itself, such as the minimum version of terraform required. While a provider block is necessary for terraform to interact with cloud providers.
We must declare the provider required for terraform to install and use it. In our case, AWS is the cloud provider.
Let's proceed with our terraform and provider block declaration.
- Create a directory for the project.
- While in the directory, create a new file and name it provider.tf. Note that the file can be given any name, but the tf extension is mandatory.
- Copy and paste the code below into the file.
terraform {
  required_providers {
    AWS = {
      source  = "hashicorp/aws"
      version = "~> 4.16"
    }
  }

  required_version = ">= 1.2.0"
}

provider "aws" {
  region = "us-east-1"
}
Save the file and run the commands below in the CLI. Note that you have to be in the directory of this project.
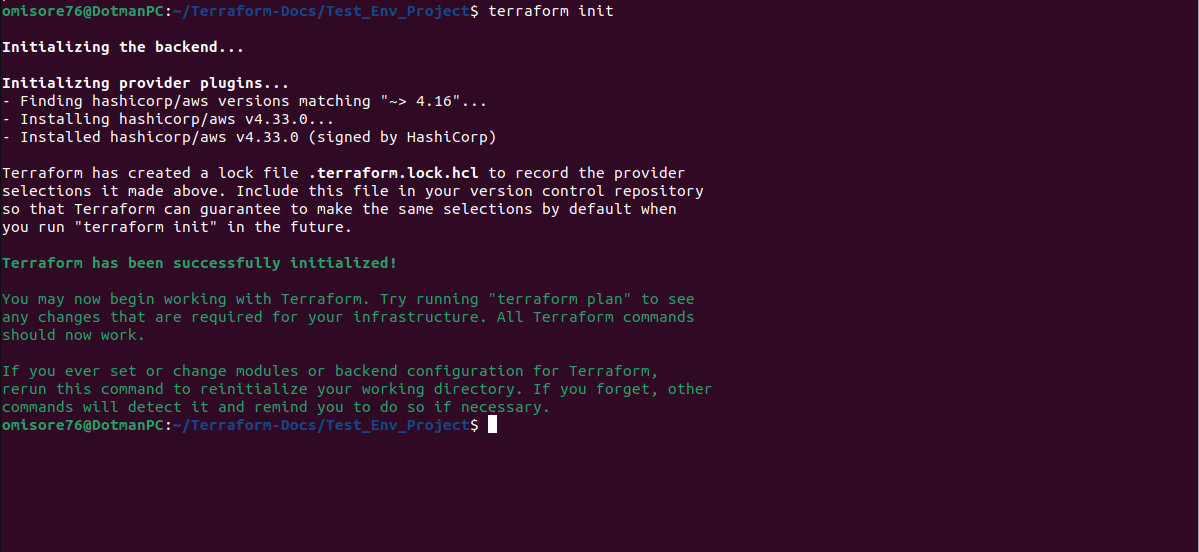
terraform init
terraform plan
terraform apply -auto-approve
Terraform init is a command for initializing the directory containing terraform files.
Terraform plan is used for previewing the changes terraform is about to make to our infrastructure. We will see more of this in action.
terraform apply -auto-approve is for applying the changes proposed by terraform plan
Input Variable
Variables allow us to define centrally controlled reusable values. We will create one in this project. Create a new file in the project directory, and name it variables.tf. Paste the following code.
variable "env_name" {
  type    = string
  default = "dev"
}
A variable block starts with the “variable” keyword. Follow by the name of the variable in the quotes. And finally, the parameters are specified inside a curly brace.
We have just created a variable named env_name.
AWS VPC
We will start provisioning our AWS resources one after another. We shall begin with a VPC.
While in the project directory, create a new file and name it main.tf. This file will contain all the code for our AWS resources. Note: The file can be given any random name of your choice, but the .tf extension must persist.
Copy and paste the following code:
resource "aws_vpc" "dot_dev_vpc" {
  cidr_block = "30.0.0.0/16"
  tags = {
    Name = var.env_name
  }
}
A resource block is declared using the "resource" keyword. Next, we specified the resource we needed to provision. In terraform, there is a convention for expressing a resource that needs to be provisioned.
We must start with the provider’s name (as in this case), followed by an underscore, and then the resource name (vpc in this case) with everything in small letters.
Specifying a unique identifier when provisioning a resource using terraform is also mandatory. The unique identifier is used to refer to the resource from elsewhere in the same terraform file. “dot_dev_vpc” is our unique identifier for this resource.
The next step is specifying parameters for the resource. Using a graphical interface on AWS, you should be familiar with cidr_block and tags from provisioning resources.
Save the file and run the commands below
terraform plan
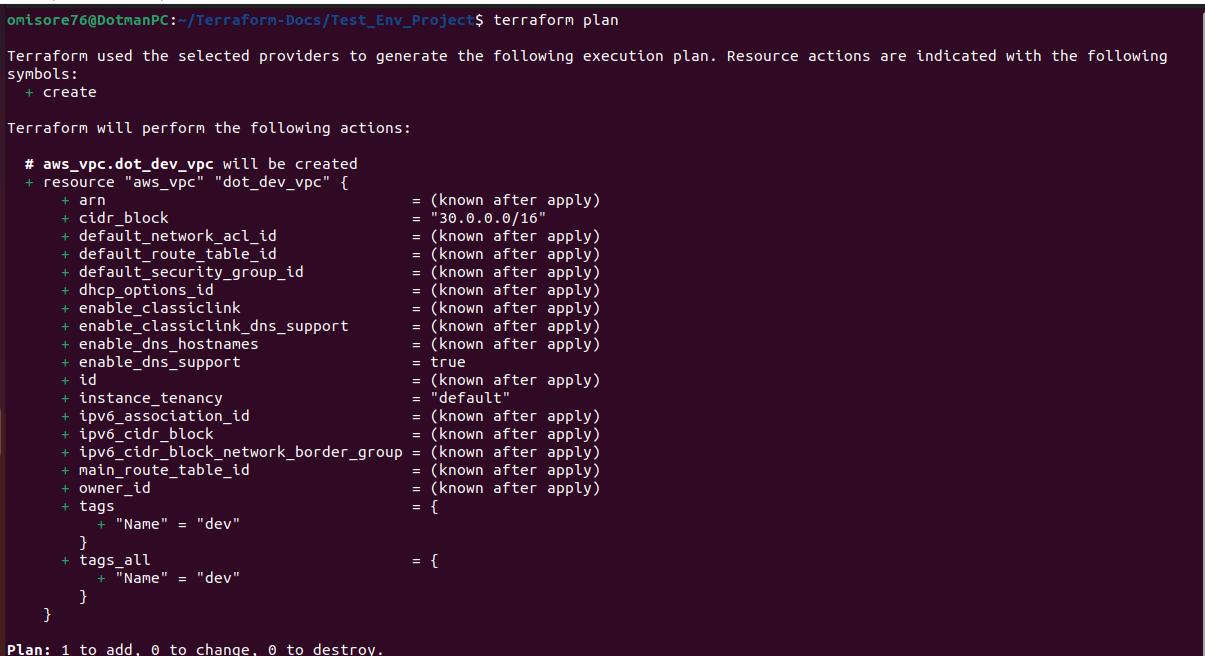
terraform apply -auto-approve
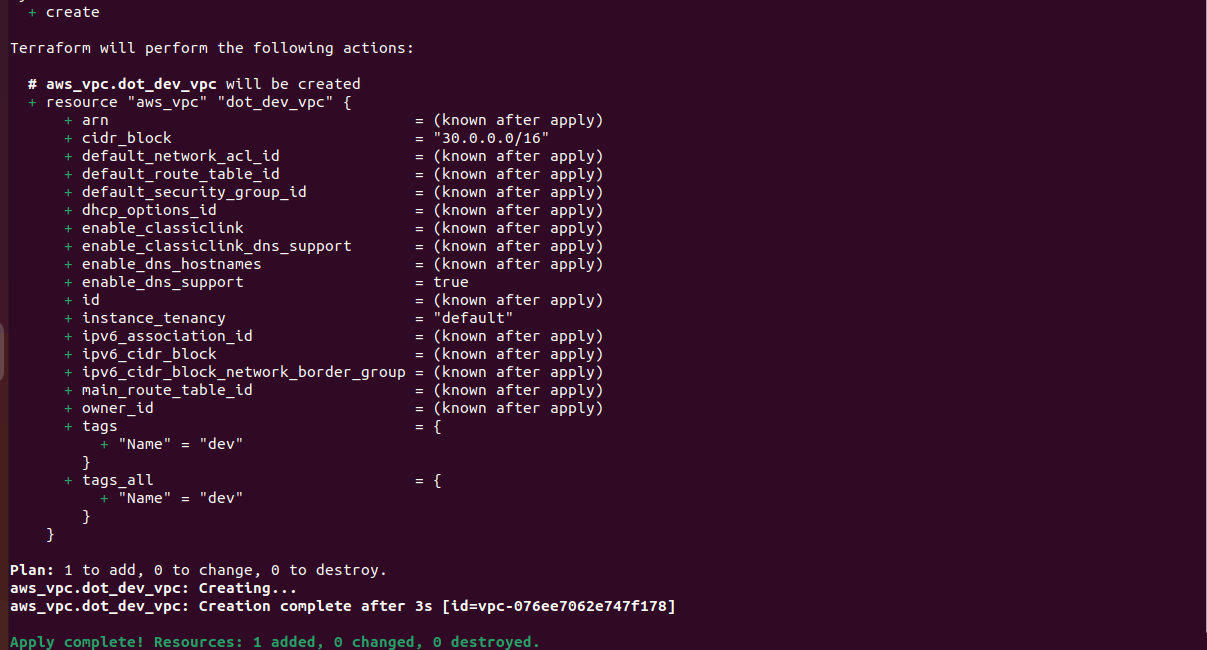
From the "terraform plan" output, we could see terraform planned to provision one resource in AWS. It is what we wanted. So, we ran the "terraform apply -auto-approve" command to proceed with provisioning the resource.
We have just provisioned our first resources on AWS using terraform. Congratulations!
Public Subnet
The next on the list is a public subnet. We will build on our first resource.
Open the main.tf file, and add the following line of code.
resource "aws_subnet" "dot_dev_subnet" {
  vpc_id                  = aws_vpc.dot_dev_vpc.id
  cidr_block              = "30.0.1.0/24"
  availability_zone       = "us-east-1a"
  map_public_ip_on_launch = true

  tags = {
    Name = var.env_name
  }
}
As we can see, writing code to provision resources on AWS using terraform is intuitive, and one can guess what this code is about to do.
The only thing that could be strange to us is the vpc_id value. Let’s quickly dive into that line of code. We only reference the id of the VPC we created earlier.
To reference one of the outputs generated by another resource, we will first type the resource's name, followed by a dot (.), the unique identifier, and another dot(.). The output needed, id in our case.
In our main.tf file, we should now have the following code:
resource "aws_vpc" "dot_dev_vpc" {
  cidr_block = "30.0.0.0/16"
  tags = {
    Name = var.env_name
  }
}

resource "aws_subnet" "dot_dev_subnet" {
  vpc_id                  = aws_vpc.dot_dev_vpc.id
  cidr_block              = "30.0.1.0/24"
  availability_zone       = "us-east-1a"
  map_public_ip_on_launch = true

  tags = {
    Name = var.env_name
  }
Save the file and run the commands below:
terraform plan
terraform apply -auto-approve
As we can see, terraform planned to add one additional resource. This makes sense since we added another resource block in our main.tf file.
Terraform apply -auto-approve command applied the proposed changes.
Now, we know how terraform provisions resources when we add a new block of resources. We will check our AWS dashboard to confirm if our resources have been created.
Internet Gateway
The Internet gateway is next on the list. To create an internet gateway, we will add the following lines of code to the main.tf file.
resource "aws_internet_gateway" "dot_dev_ig" {
  vpc_id = aws_vpc.dot_dev_vpc.id
  tags = {
    Name = var.env_name
  }
}
The resource block is self-explanatory. We specified the id of the VPC we want the internet gateway to be attached to. And we gave it a tag.
In our main.tf file, we should now have the following code:
resource "aws_vpc" "dot_dev_vpc" {
  cidr_block = "30.0.0.0/16"
  tags = {
    Name = var.env_name
  }
}

resource "aws_subnet" "dot_dev_subnet" {
  vpc_id                  = aws_vpc.dot_dev_vpc.id
  cidr_block              = "30.0.1.0/24"
  availability_zone       = "us-east-1a"
  map_public_ip_on_launch = true

  tags = {
    Name = var.env_name
  }
}

resource "aws_internet_gateway" "dot_dev_ig" {
  vpc_id = aws_vpc.dot_dev_vpc.id

  tags = {
    Name = var.env_name
  }
}
As we have done before, we will run the terraform plan command to check the plan. And the terraform -auto-apply command to apply the plan.
Route Table
Let’s provision a route table. Add the following lines of code to the main.tf file.
resource "aws_route_table" "dot_dev_rt" {
  vpc_id = aws_vpc.dot_dev_vpc.id
  tags = {
    Name = var.env_name
  }
}
No explanation is needed for this resource block.
As we might know, a route table is not complete without a route. So, we will include the following code to add a route to our table.
resource "aws_route" "r" {
  route_table_id         = aws_route_table.dot_dev_rt.id
  destination_cidr_block = "0.0.0.0/0"
  gateway_id             = aws_internet_gateway.dot_dev_ig.id

}
The code in our main.tf file should look something like this:
resource "aws_vpc" "dot_dev_vpc" {
  cidr_block = "30.0.0.0/16"
  tags = {
    Name = var.env_name
  }
}

resource "aws_subnet" "dot_dev_subnet" {
  vpc_id                  = aws_vpc.dot_dev_vpc.id
  cidr_block              = "30.0.1.0/24"
  availability_zone       = "us-east-1a"
  map_public_ip_on_launch = true

  tags = {
    Name = var.env_name
  }
}

resource "aws_internet_gateway" "dot_dev_ig" {
  vpc_id = aws_vpc.dot_dev_vpc.id

  tags = {
    Name = var.env_name
  }
}

resource "aws_route_table" "dot_dev_rt" {
  vpc_id = aws_vpc.dot_dev_vpc.id
  tags = {
    Name = var.env_name
  }
}

resource "aws_route" "r" {
  route_table_id         = aws_route_table.dot_dev_rt.id
  destination_cidr_block = "0.0.0.0/0"
  gateway_id             = aws_internet_gateway.dot_dev_ig.id

}
Guess the next step? You guessed right. We will run terraform plan, then terraform apply -auto-approve.
Note: we would see that terraform proposed to add two new resources. This is okay since we included two new resource blocks in our file.
Route table association
We need to associate the route table with a subnet, our public subnet in this case. Include the following lines of code in the main.tf file.
resource "aws_route_table_association" "dot_dev_tba" {
  subnet_id      = aws_subnet.dot_dev_subnet.id
  route_table_id = aws_route_table.dot_dev_rt.id
}
In the parameters block, we referenced the id of the route table and subnet we created earlier.
The code in our main.tf file should look something like this:
resource "aws_vpc" "dot_dev_vpc" {
  cidr_block = "30.0.0.0/16"
  tags = {
    Name = var.env_name
  }
}

resource "aws_subnet" "dot_dev_subnet" {
  vpc_id                  = aws_vpc.dot_dev_vpc.id
  cidr_block              = "30.0.1.0/24"
  availability_zone       = "us-east-1a"
  map_public_ip_on_launch = true

  tags = {
    Name = var.env_name
  }
}

resource "aws_internet_gateway" "dot_dev_ig" {
  vpc_id = aws_vpc.dot_dev_vpc.id

  tags = {
    Name = var.env_name
  }
}

resource "aws_route_table" "dot_dev_rt" {
  vpc_id = aws_vpc.dot_dev_vpc.id
  tags = {
    Name = var.env_name
  }
}

resource "aws_route" "r" {
  route_table_id         = aws_route_table.dot_dev_rt.id
  destination_cidr_block = "0.0.0.0/0"
  gateway_id             = aws_internet_gateway.dot_dev_ig.id

}

resource "aws_route_table_association" "dot_dev_tba" {
  subnet_id      = aws_subnet.dot_dev_subnet.id
  route_table_id = aws_route_table.dot_dev_rt.id
}
Next, we will run terraform plan and terraform apply -auto-approve.
Security Group
Now, we will create a security group, which is important for our EC2 instance. We will allow HTTP and HTTPS connections. As well as ssh connection.
Add the code below to the main.tf file.
resource "aws_security_group" "dot_dev_sg" {
  name        = "dev_security_group"
  description = "Allow inbound HTTP,HTTPS, and ssh traffic"
  vpc_id      = aws_vpc.dot_dev_vpc.id

  ingress {
    description = "HTTP traffic"
    from_port   = 80
    to_port     = 80
    protocol    = "TCP"
    cidr_blocks = ["0.0.0.0/0"]

  }

  ingress {
    description = "HTTPS traffic"
    from_port   = 443
    to_port     = 443
    protocol    = "TCP"
    cidr_blocks = ["0.0.0.0/0"]

  }

  ingress {
    description = "SSH Connection"
    from_port   = 22
    to_port     = 22
    protocol    = "TCP"
    cidr_blocks = ["0.0.0.0/0"]

  }


  egress {
    from_port   = 0
    to_port     = 0
    protocol    = "-1"
    cidr_blocks = ["0.0.0.0/0"]
  }

  tags = {
    Name = "allow_tls"
  }
}
The code in our main.tf file should look something like this:
resource "aws_vpc" "dot_dev_vpc" {
  cidr_block = "30.0.0.0/16"
  tags = {
    Name = var.env_name
  }
}

resource "aws_subnet" "dot_dev_subnet" {
  vpc_id                  = aws_vpc.dot_dev_vpc.id
  cidr_block              = "30.0.1.0/24"
  availability_zone       = "us-east-1a"
  map_public_ip_on_launch = true

  tags = {
    Name = var.env_name
  }
}

resource "aws_internet_gateway" "dot_dev_ig" {
  vpc_id = aws_vpc.dot_dev_vpc.id

  tags = {
    Name = var.env_name
  }
}

resource "aws_route_table" "dot_dev_rt" {
  vpc_id = aws_vpc.dot_dev_vpc.id
  tags = {
    Name = var.env_name
  }
}

resource "aws_route" "r" {
  route_table_id         = aws_route_table.dot_dev_rt.id
  destination_cidr_block = "0.0.0.0/0"
  gateway_id             = aws_internet_gateway.dot_dev_ig.id

}

resource "aws_route_table_association" "dot_dev_tba" {
  subnet_id      = aws_subnet.dot_dev_subnet.id
  route_table_id = aws_route_table.dot_dev_rt.id
}

resource "aws_security_group" "dot_dev_sg" {
  name        = "dev_security_group"
  description = "Allow inbound http,https, and ssh traffic"
  vpc_id      = aws_vpc.dot_dev_vpc.id

  ingress {
    description = "HTTP traffic"
    from_port   = 80
    to_port     = 80
    protocol    = "TCP"
    cidr_blocks = ["0.0.0.0/0"]

  }

  ingress {
    description = "HTTPS traffic"
    from_port   = 443
    to_port     = 443
    protocol    = "TCP"
    cidr_blocks = ["0.0.0.0/0"]

  }

  ingress {
    description = "SSH Connection"
    from_port   = 22
    to_port     = 22
    protocol    = "TCP"
    cidr_blocks = ["0.0.0.0/0"]

  }


  egress {
    from_port   = 0
    to_port     = 0
    protocol    = "-1"
    cidr_blocks = ["0.0.0.0/0"]
  }

  tags = {
    Name = "allow_tls"
  }
}
As always, we'll run terraform plan and terraform apply -auto-approve.
Keypair
Next, we will generate a keypair to prove our identity when connecting with the amazon EC2 instance.
We will run the following command on our local machine to generate this key pair.
sh-keygeb -t ed25519
When prompted to enter the location to save the file, type ~/.ssh/ec2_keypair.
Now that our keypair has been generated and saved, we will add the following lines of code to the main.tf file.
resource "aws_key_pair" "dot_dev_keypair" {
  key_name   = "ec2-key pair"
  public_key = file("~/.ssh/ec2_keypair.pub")
}
In our main.tf file, we should now have the following code:
resource "aws_vpc" "dot_dev_vpc" {
  cidr_block = "30.0.0.0/16"
  tags = {
    Name = var.env_name
  }
}

resource "aws_subnet" "dot_dev_subnet" {
  vpc_id                  = aws_vpc.dot_dev_vpc.id
  cidr_block              = "30.0.1.0/24"
  availability_zone       = "us-east-1a"
  map_public_ip_on_launch = true

  tags = {
    Name = var.env_name
  }
}

resource "aws_internet_gateway" "dot_dev_ig" {
  vpc_id = aws_vpc.dot_dev_vpc.id

  tags = {
    Name = var.env_name
  }
}

resource "aws_route_table" "dot_dev_rt" {
  vpc_id = aws_vpc.dot_dev_vpc.id
  tags = {
    Name = var.env_name
  }
}

resource "aws_route" "r" {
  route_table_id         = aws_route_table.dot_dev_rt.id
  destination_cidr_block = "0.0.0.0/0"
  gateway_id             = aws_internet_gateway.dot_dev_ig.id

}

resource "aws_route_table_association" "dot_dev_tba" {
  subnet_id      = aws_subnet.dot_dev_subnet.id
  route_table_id = aws_route_table.dot_dev_rt.id
}

resource "aws_security_group" "dot_dev_sg" {
  name        = "dev_security_group"
  description = "Allow inbound http,https, and ssh traffic"
  vpc_id      = aws_vpc.dot_dev_vpc.id

  ingress {
    description = "HTTP traffic"
    from_port   = 80
    to_port     = 80
    protocol    = "TCP"
    cidr_blocks = ["0.0.0.0/0"]

  }

  ingress {
    description = "HTTPS traffic"
    from_port   = 443
    to_port     = 443
    protocol    = "TCP"
    cidr_blocks = ["0.0.0.0/0"]

  }

  ingress {
    description = "SSH Connection"
    from_port   = 22
    to_port     = 22
    protocol    = "TCP"
    cidr_blocks = ["0.0.0.0/0"]

  }

  egress {
    from_port   = 0
    to_port     = 0
    protocol    = "-1"
    cidr_blocks = ["0.0.0.0/0"]
  }

  tags = {
    Name = "allow_tls"
  }
}

resource "aws_key_pair" "dot_dev_keypair" {
  key_name   = "ec2-keypair"
  public_key = file("~/.ssh/ec2_keypair.pub")
}
We'll run terraform plan and terraform apply -auto-approve like always.
Ami Data Source
An AMI image is necessary to create an EC2 resource on AWS. To specify our AMI image, we will use a data source.
While in the project directory, we will create a new file and name it data source.tf. Then, paste the following code to it.
data "aws_ami" "dot_dev_ami" {
  most_recent = true
  owners      = ["099720109477"]

  filter {
    name   = "name"
    values = ["ubuntu/images/hvm-SSD/ubuntu-jammy-22.04-amd64-server-*"]
  }
User data
The next on the list is the user data. Create a new file, and name it user_data.sh. And paste the following code in it.
sudo apt-get update -y
sudo apt-get install -y git
EC2 Instance
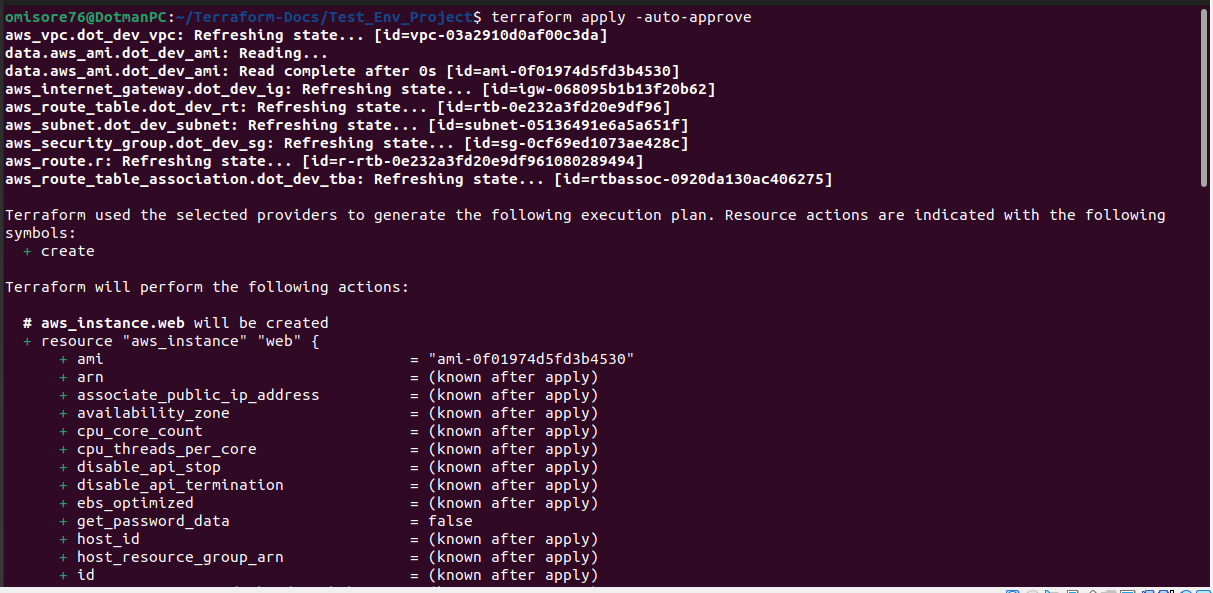
Finally, we are ready to create our EC2 instance. Add the following resource block to the main.tf file.
resource "aws_instance" "web" {
  ami                    = data.aws_ami.dot_dev_ami.id
  instance_type          = "t2.micro"
  key_name               = aws_key_pair.dot_dev_keypair.id
  vpc_security_group_ids = [aws_security_group.dot_dev_sg.id]
  subnet_id              = aws_subnet.dot_dev_subnet.id
  user_data              = file("user_data.sh")
  tags = {
    Name = var.env_name
  }
}
The code in our main.tf file should look something like this:
resource "aws_vpc" "dot_dev_vpc" {
  cidr_block = "30.0.0.0/16"
  tags = {
    Name = var.env_name
  }
}

resource "aws_subnet" "dot_dev_subnet" {
  vpc_id                  = aws_vpc.dot_dev_vpc.id
  cidr_block              = "30.0.1.0/24"
  availability_zone       = "us-east-1a"
  map_public_ip_on_launch = true

  tags = {
    Name = var.env_name
  }
}

resource "aws_internet_gateway" "dot_dev_ig" {
  vpc_id = aws_vpc.dot_dev_vpc.id

  tags = {
    Name = var.env_name
  }
}

resource "aws_route_table" "dot_dev_rt" {
  vpc_id = aws_vpc.dot_dev_vpc.id
  tags = {
    Name = var.env_name
  }
}

resource "aws_route" "r" {
  route_table_id         = aws_route_table.dot_dev_rt.id
  destination_cidr_block = "0.0.0.0/0"
  gateway_id             = aws_internet_gateway.dot_dev_ig.id

}

resource "aws_route_table_association" "dot_dev_tba" {
  subnet_id      = aws_subnet.dot_dev_subnet.id
  route_table_id = aws_route_table.dot_dev_rt.id
}

resource "aws_security_group" "dot_dev_sg" {
  name        = "dev_security_group"
  description = "Allow inbound http,https, and ssh traffic"
  vpc_id      = aws_vpc.dot_dev_vpc.id

  ingress {
    description = "HTTP traffic"
    from_port   = 80
    to_port     = 80
    protocol    = "TCP"
    cidr_blocks = ["0.0.0.0/0"]

  }

  ingress {
    description = "HTTPS traffic"
    from_port   = 443
    to_port     = 443
    protocol    = "TCP"
    cidr_blocks = ["0.0.0.0/0"]

  }

  ingress {
    description = "SSH Connection"
    from_port   = 22
    to_port     = 22
    protocol    = "TCP"
    cidr_blocks = ["0.0.0.0/0"]

  }

  egress {
    from_port   = 0
    to_port     = 0
    protocol    = "-1"
    cidr_blocks = ["0.0.0.0/0"]
  }

  tags = {
    Name = "allow_tls"
  }
}

resource "aws_key_pair" "dot_dev_keypair" {
  key_name   = "ec2-keypair"
  public_key = file("~/.ssh/ec2_keypair.pub")
}

resource "aws_instance" "web" {
  ami                    = data.aws_ami.dot_dev_ami.id
  instance_type          = "t2.micro"
  key_name               = aws_key_pair.dot_dev_keypair.id
  vpc_security_group_ids = [aws_security_group.dot_dev_sg.id]
  subnet_id              = aws_subnet.dot_dev_subnet.id
  user_data              = file("user_data.sh")
  tags = {
    Name = var.env_name
  }
}
Run terraform plan and terraform apply auto-approve to apply our changes.
We have just deployed an EC2 instance in a public subnet that lies in a VPC we created. Congratulations!
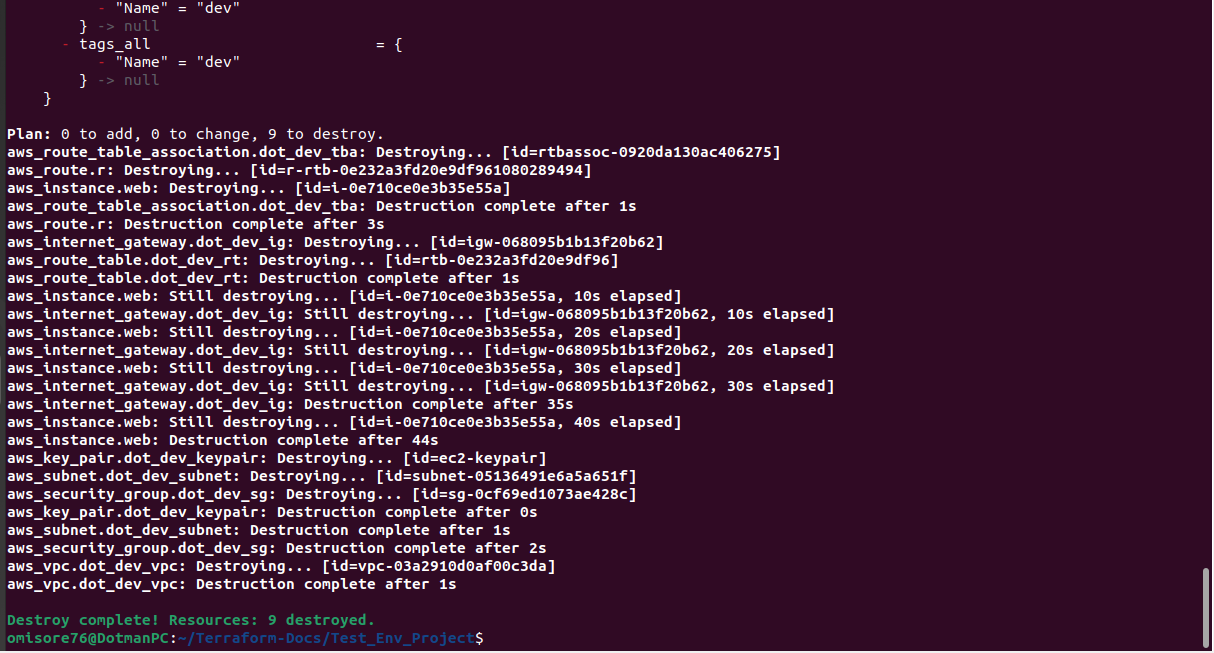
Destroying the Resources
We will destroy all the resources we created to ensure we do not incur any unwanted or unnecessary charges. We will run terraform destroy- auto-approve to destroy all the resources we have created in this project.